A NinePatch Image is a special PNG image which allows the Android system to automatically resize images according to the contents without any distortion and stretching. This allows developers to create scalable UI elements like buttons, progress bars, and background images, which do not have multiple resource sets for different screen sizes.
Creating a NinePatch Image
Draw 9-patch is a tool within Android Studio for creating and editing NinePatch images. It allows developers to intuitively draw black pixel lines along the borders and preview how the image looks in different sizes. There are many online resources and applications available for making NinePatch images apart from the tools that come with Android Studio, such as 9 Patch Editor.
Use of NinePatch Images
Using NinePatch images in Android apps is straightforward: you add them to the project res/drawable folder and then reference them using android:background in your XML layout file. For example:
<Button android:id="@+id/tiny"
        android:layout_width="wrap_content"
        android:layout_height="wrap_content"
        android:layout_alignParentTop="true"
        android:layout_centerInParent="true"
        android:text="Tiny"
        android:textSize="8sp"
        android:background="@drawable/my_button_background"/>

<Button android:id="@+id/big"
        android:layout_width="wrap_content"
        android:layout_height="wrap_content"
        android:layout_alignParentBottom="true"
        android:layout_centerInParent="true"
        android:text="Biiiiiiig text!"
        android:textSize="30sp"
        android:background="@drawable/my_button_background"/>
Be careful, layout_width and layout_height should wrap_content to display buttons neatly with text.
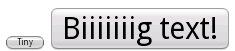
The following shows two buttons rendered through XML and NinePatch images. As in the above figure, observe how the width and height of the buttons change with the text, while the background image is stretched to fit the screen.
Scenarios of NinePatch
-
Button Backgrounds: This is the most common apply-case for Drawables. Since text length may be varied with different buttons, NinePatch makes sure that the background image can be fully covered and does not go outside the boundary or deform with the button from inside text position. For example, if we have a round corner button background, we will use NinePatch and whatever the length of the button text is, the round corners will remain unchanged.
-
Progress Bar Backgrounds: It stretches the background image across the fixed unit distance with the progress bar where the unit distances are different and varies with loading from one system to another. NinePatch will ensure that the styling for the Background image wouldn't become distorted while stretching.
-
Background for the List Item: In the list view, the backgrounds of these list items actually need to be different depending on the length of content put into the view. NinePatch ensures that the background images stretch quite beautifully without distorting.
-
Dialog Cage Backgrounds: In such cases, the size of the Dialog changes from content. NinePatch ensures that the background images stretch consistently with the same style.
-
Scalable Divider: With NinePatch, a user can design a horizontal or vertical stretchable divider, catering for several screen sizes and layout adaptabilities.
-
User-defined shape backgrounds: NinePatch constructs a variety of user-defined shapes backgrounds such as corners rounded, shadowed, etc. having different special effects with no changes to these effects while stretching.
Advantages of NinePatch
- Scalability: This is the biggest advantage of NinePatch. Resize automatically based on content, thus eliminating the need to maintain multiple resource sets for different screen sizes and lengths of content.
- Avoid the distortion: The coordinate control of the stretchable area prevents the images from stretching. The properties of sharpness and pretty are preserved at most times.
- Increased efficiency: Less resource files and hence increased efficiency in development.
- Flexible arrangement: It can easily create different shapes and sizes of UI elements to suit various layout requirements.
Working of NinePatch
The hallmark NinePatch image is an entirely narrow border of a pixel. That border defines the scalableness and the area of the image contents. Drawing black pixel lines on the edges says which part is to stretch in the periphery, which one vertically, and which one horizontally.

In particular, a 1 pixel border is divided into four parts:
1. Left border (vertical black pixel line):
-
Function: Controls the vertical stretch of the image. The vertical black pixel line on the left border defines which areas of the image can be stretched vertically.
-
For example:
-
A no-black pixel line: The height of the image is fixed; hence, it is not capable of vertical stretching. If it is being tried to put in a container that is higher than the image itself, it will remain as is and may have blank areas or gets cut.
-
One black pixel line: The image can be stretched vertically but then limited to the areas specified by the black pixel lines. For example, if a black pixel line is placed in the middle of a left border, it would mean the upper half and lower half will not change, with vertical stretching allowed only in the middle part.
-
Multiple black pixel lines: It can be defined by several vertical stretching regions. For instance, there will be two black pixel lines at a left border, which divide the image into three parts at the center stretchable parts, with the top and bottom parts remaining unchanged.
-
2. Upper Border: (Water horizontal black pixel lines):
-
Function: Control the horizontal stretching of the image. A horizontal black pixel line at the top border defines the stretchable parts of the image in the horizontal dimension.
-
For example:
-
A no-black pixel line: The image width is fixed and not horizontally stretched. Similar to no black pixel line case at the left border, the image will just stay the same but may have blank areas or be cut.
-
One black pixel line: The image may stretch horizontally but then again, only in the area specified by the black pixel line. For example, if the black pixel line is in the middle of the upper boundary, the left half of the image will not change, nor the right half, only allowing some stretching in the middle.
-
Multiple black pixel lines: It defines various lateral stretchable regions. Like the case of the left border with various horizontal black pixel lines, it divides the image into many parts, and any section thus marked can stretch horizontally.
-
3. Righborder (Vertical Black Pixel Lines):
-
Function: Define the right padding of content area. The vertical black pixel lines on the right margin indicate the right boundary of the image content area. During stretching, the right side of the content area will remain on this boundary.
-
Examples:
-
No black pixel lines: Content area extends all the way to the image's right margin, not flexing when the content stretches, leaving image content extending to the right edge.
-
One black pixel line: The right edge of the content area is determined by the position of the black pixel line. When stretched, the right side of the content area will hold in place at the black pixel line while the space to the right is streched.
-
4. Bottom boundary (the horizontal black pixel line):
-
Function: Define the lower margin of the area within which the content is confined. The horizontal black pixel line at the bottom defines where the lower boundary of the image's content area ends. Extents the bottom of the content area would remain at that boundary when stretched.
-
Example:
-
No black pixel line: the content area extends to the bottom edge of the image. When stretched, the entirety of image content stretches to the bottom edge.
-
One black pixel line: the lower boundary of the content area derives from the position of the black pixel line. When stretched, the bottom of the content area will remain at the level of the black pixel line and whitespace below will be stretched.
-
Using clever black pixel lines on these four borders, it is possible for the programmer to control precisely how the Nine Patch image comes out displaying at varying sizes while ensuring that it does so without deformation or loss of the content area. Keep in mind that those pixel lines are the definition bounds of stretchable area from content area, not the actual bounds of image. The parts with no black pixel lines are fixed-sized components.
Notes
- A NinePatch image should be saved by a filename ending with .9.png.
- A minimum dimension of 2x2 pixels in the stretchable area is necessary so that the image does not disappear upon scaling.
- Additional safety space at the edges of the stretchable area can eliminate color changes that occur while scaling.
- Make sure to check the stretchable and content regions of the image very thoroughly so that the image displays correctly at various dimensions.
- Do not overuse NinePatch images especially in animated interfaces, or those that change frequently, as they decrease performance.
Summary
NinePatch images are the most powerful tools for leveraging efficiency in UI design and improving user experience in Android applications. However, this does not mean that developers will not have to balance the advantages and limitations, as the choice of the type of image depends on the requirement. For example, even if NinePatch Images are the right choice for scalable backgrounds or UI elements that need to accept different lengths of text, normal PNG images will do just fine for static background images-their simplicity is the catch. In using NinePatch, the utmost care in design and testing must be exercised to ensure that it performs excellently across a range of devices and screen sizes.